
Can You Propagate Clematis? A Comprehensive Guide to Successful Clematis Propagation
Clematis, with its stunning blooms and vigorous climbing habit, is a favorite among gardeners. But what if you could multiply your collection without breaking the bank? The good news is, can you propagate clematis? Absolutely! Propagating clematis is entirely possible, albeit requiring patience and the right techniques. This guide will walk you through the most effective methods for propagating these beautiful vines, ensuring you can expand your garden with your favorite varieties.
Why Propagate Clematis?
Before diving into the how-to, let’s consider why you might want to propagate clematis. Firstly, it’s a cost-effective way to increase your plant stock. Instead of purchasing new plants, you can create them from existing ones. Secondly, propagating your own clematis allows you to preserve desirable traits from specific cultivars. Finally, it’s a rewarding experience to nurture new plants from cuttings or layers.
Methods of Clematis Propagation
Several methods can be used to propagate clematis, each with its own advantages and disadvantages. The most common techniques include:
- Stem Cuttings
- Layering
- Seed Propagation
We’ll explore each of these in detail.
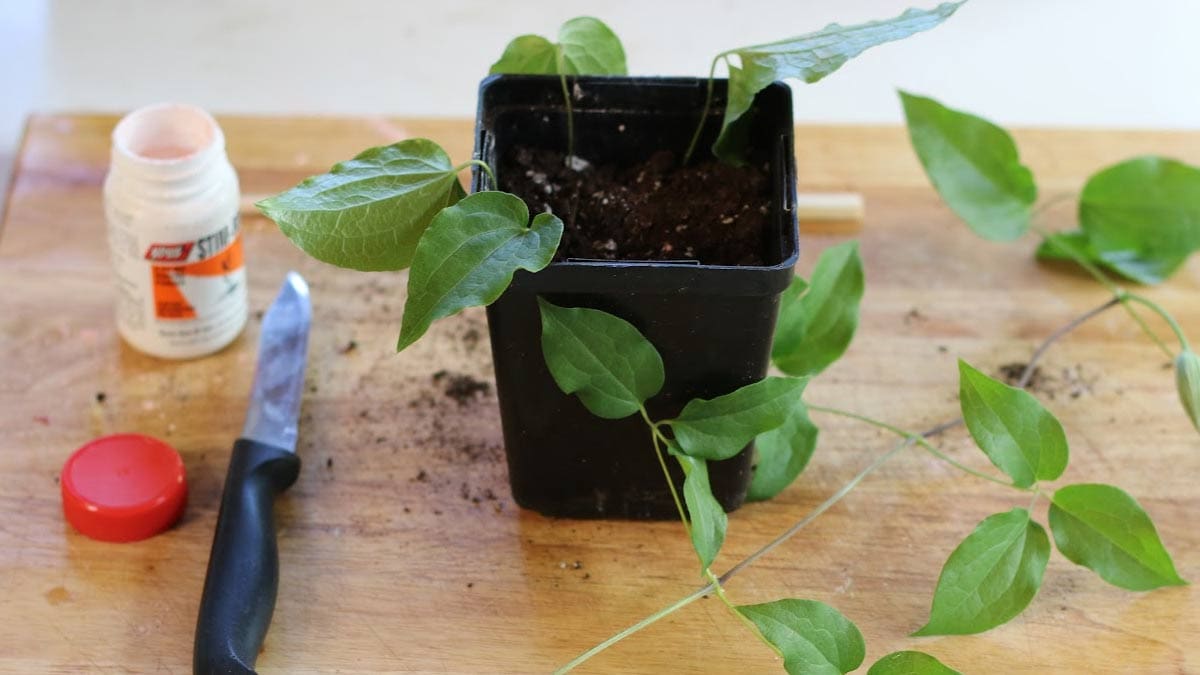
Propagating Clematis from Stem Cuttings
Taking stem cuttings is a popular method for propagating many plants, including clematis. This technique involves rooting a section of the stem to create a new, independent plant.
When to Take Cuttings
The best time to take clematis cuttings is in late spring or early summer, when the plant is actively growing but the stems are still relatively soft. This is often referred to as taking “softwood cuttings”.
How to Take Cuttings
- Select a Healthy Stem: Choose a healthy, non-flowering stem from your clematis plant. The stem should be about 4-6 inches long.
- Prepare the Cutting: Using a clean, sharp knife or pruning shears, make a cut just below a node (the point where leaves emerge). Remove the lower leaves, leaving only a few at the top. This reduces moisture loss and encourages root development.
- Apply Rooting Hormone: Dip the cut end of the stem into rooting hormone powder or liquid. This will stimulate root growth.
- Plant the Cutting: Fill a small pot with a well-draining potting mix. Make a hole in the center of the soil and insert the cutting, ensuring that at least one node is buried. Gently firm the soil around the cutting.
- Provide Humidity: Cover the pot with a plastic bag or place it in a propagator to create a humid environment. This helps prevent the cutting from drying out.
- Care for the Cutting: Place the pot in a warm, bright location, but out of direct sunlight. Keep the soil consistently moist, but not waterlogged.
- Check for Root Development: After a few weeks, gently tug on the cutting. If it resists, it has likely developed roots. You can also check for root growth by gently removing the cutting from the pot.
- Transplant the Cutting: Once the cutting has developed a good root system, you can transplant it into a larger pot or directly into the garden.
Propagating Clematis by Layering
Layering is another effective method for propagating clematis. This technique involves rooting a stem while it is still attached to the parent plant. This ensures the cutting receives nutrients and moisture during the rooting process, increasing the chances of success.
When to Layer
The best time to layer clematis is in spring or early summer.
How to Layer
- Select a Suitable Stem: Choose a long, flexible stem that can be easily bent to the ground.
- Prepare the Stem: Remove the leaves from the section of the stem that will be buried.
- Make a Wound: Gently wound the underside of the stem by making a shallow cut or scraping the surface. This encourages root development.
- Bury the Stem: Dig a shallow trench in the soil near the parent plant. Lay the prepared stem in the trench and secure it with a garden staple or rock. Make sure the wounded area is in contact with the soil.
- Keep the Soil Moist: Water the layered stem regularly to keep the soil consistently moist.
- Check for Root Development: After several weeks or months, check for root development by gently digging around the buried stem.
- Separate the Layered Stem: Once the stem has developed a good root system, you can separate it from the parent plant by cutting the stem between the rooted section and the parent plant.
- Transplant the Layered Plant: Transplant the newly rooted plant into a pot or directly into the garden.
Layering is a reliable way to propagate clematis, especially for those varieties that are difficult to root from cuttings. The constant supply of nutrients from the mother plant gives the new plant a great start.
Propagating Clematis from Seed
While propagating clematis from seed is possible, it’s generally a less reliable and more time-consuming method than taking cuttings or layering. Seed-grown clematis may not always be true to the parent plant, meaning the offspring might not have the same characteristics as the original. However, if you’re feeling adventurous, here’s how to propagate clematis from seed:
When to Collect Seeds
Collect clematis seeds in the fall, after the seed heads have dried. The seeds are typically attached to feathery plumes.
How to Sow Seeds
- Stratify the Seeds: Clematis seeds typically require stratification, a period of cold, moist storage that mimics winter conditions. To stratify the seeds, place them in a plastic bag filled with moist sand or peat moss. Seal the bag and store it in the refrigerator for 2-3 months.
- Sow the Seeds: After stratification, sow the seeds in a seed tray filled with a well-draining seed-starting mix. Lightly cover the seeds with soil.
- Keep the Soil Moist: Keep the soil consistently moist, but not waterlogged.
- Provide Light: Place the seed tray in a bright location, but out of direct sunlight.
- Wait for Germination: Germination can be slow and erratic, taking several weeks or even months.
- Transplant Seedlings: Once the seedlings are large enough to handle, transplant them into individual pots.
Tips for Successful Clematis Propagation
Regardless of the method you choose, here are some general tips for successful clematis propagation:
- Use Clean Tools: Always use clean, sharp tools to prevent the spread of disease.
- Provide Adequate Moisture: Keep the soil consistently moist, but not waterlogged.
- Maintain Humidity: High humidity is essential for successful rooting.
- Protect from Direct Sunlight: Avoid exposing cuttings or seedlings to direct sunlight, which can cause them to dry out.
- Be Patient: Propagation can take time, so be patient and don’t give up if you don’t see results immediately.
Troubleshooting Common Problems
Even with the best techniques, you might encounter some challenges when propagating clematis. Here are some common problems and how to address them:
- Cuttings Rotting: This is usually caused by overwatering or poor drainage. Ensure your potting mix is well-draining and avoid overwatering.
- Lack of Root Development: This could be due to insufficient humidity, low temperatures, or a lack of rooting hormone. Ensure your cuttings are in a humid environment, maintain a consistent temperature, and use rooting hormone.
- Slow Growth: Clematis can be slow to get established. Be patient and provide the plants with proper care, including adequate light, water, and nutrients.
Choosing the Right Clematis for Propagation
Not all clematis varieties are created equal when it comes to propagation. Some cultivars are easier to root than others. Generally, those in pruning group 2 tend to be easier to propagate. Experimenting with different varieties can help you discover which ones are most amenable to your propagation efforts. Understanding the specific needs of the clematis you want to propagate clematis is crucial for success. [See also: Clematis Pruning Guide]
The Role of Rooting Hormones
Rooting hormones contain auxins, which are plant hormones that stimulate root development. While some plants can root without the aid of rooting hormone, using it can significantly increase the success rate of clematis propagation, especially when taking stem cuttings. Rooting hormones are available in powder, liquid, and gel forms. Follow the instructions on the product label for the best results. Remember, a little goes a long way; using too much rooting hormone can actually inhibit root growth.
Acclimatizing New Clematis Plants
Once your clematis cuttings or layered plants have developed a strong root system, it’s important to acclimatize them gradually to outdoor conditions before transplanting them into the garden. This process, known as hardening off, helps the plants adjust to changes in temperature, humidity, and sunlight. Start by placing the plants outdoors for a few hours each day, gradually increasing the amount of time they spend outside over a period of one to two weeks. This will help them avoid shock when they are finally transplanted into their permanent location. Remember to protect them from strong winds and direct sunlight during this process.
Ongoing Care for Propagated Clematis
After transplanting your newly propagated clematis, provide them with the same care as established plants. This includes regular watering, fertilization, and pruning. Mulching around the base of the plant can help retain moisture and suppress weeds. Clematis also benefit from having a support structure to climb on, such as a trellis or fence. Monitor the plants regularly for signs of pests or diseases and take action as needed. With proper care, your propagated clematis will thrive and reward you with years of beautiful blooms. Knowing that can you propagate clematis has been answered, you can confidently expand your garden.
Conclusion
So, can you propagate clematis? Yes, you absolutely can! While it requires patience and attention to detail, propagating clematis is a rewarding way to expand your garden and enjoy more of these beautiful climbing plants. Whether you choose to propagate from stem cuttings, layering, or seeds, following the tips and techniques outlined in this guide will increase your chances of success. With a little practice, you’ll be able to create a stunning display of clematis in your garden. The ability to propagate clematis opens up a world of possibilities for your garden design. Embrace the journey and enjoy the process of nurturing new life!
